Still playing catch-up with this blog and frankly, on site too. The schedule went the way of the faeries a long time ago, but then I did always expect it to (I've seen Grand Designs enough - when asked the frequent "when will you be moving in" question I did say "we'd like to be in by Christmas" but always added "but realise it's unlikely to actually happen".
It could happen quicker if we paid a lot of money for more contractors to do more things, but as much as possible it will still be me and whoever I can persuade to help. I can only do one thing at once so it will take a bit longer that way. So we'll have to spend another winter in the cold, damp and mouldy bungalow we currently rent which is a shame but not that bad. That bungalow is in the process of being sold which is a whole other saga but hopefully one nearing a resolution that allows us to stay in it. The buyers want to continue to let it out for the time being, thankfully without using the obstructive and overly bureaucratic agent that recently suggested we'd need to move out for a check-out report to be done, and then move back in again (but relented after everyone else involved pointed out how ridiculous that was).
In real time: windows and doors are in, all the external walls are now full height (so there's no draughty gap beneath the sunroom/rear-porch roof overhang and the rest of the bungalow anymore), the inside of the bale walls are now stuffed and strimmed, and the final coats of lime render are on. I'm aiming to get the gable end of the bungalow finished by the end of the week (the top half of this is to be timber clad) so we can get rid of the ugly and surprisingly noisy flappy plastic (recycled silage wrap) that's currently protecting it. I'll post the final render pictures in the next blog.
Having the windows and doors fitted was another transformational moment. Suddenly the extension is an enclosed space, and the whole bungalow is a unified indoors! It's also far more secure now than it has ever been.
In preparation for the windows and doors to be fitted, naturally I had to take the old ones out first. At this point the bungalow became very cold.
Lime-spattered old Crittall windows (glavanised steel frames) awaiting collection by scrap dealer. They're cold windows but I'm impressed at how well-built they are.
The new windows arrive!
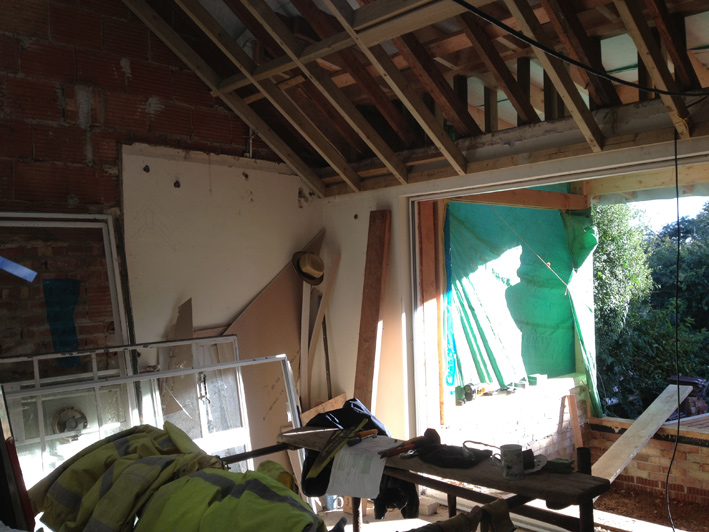
First new window (timber frame, triple-glazed with aluminium trim in the places most likely to collect water)
This is the exciting view from what will be Anna's studio.
Tony and Wayne fitting the window brackets ready to hold the window in place.
Only slightly posed action shot
Render and windows, all within a few days (the big end-gable wall was being sprayed with render as this window was fitted)
Fold-aside door (the sunroom windows/doors are coming shortly - I hadn't built this when they measured the main windows so they measured it up when fitting phase 1).
Shiny new keys, to doors that actually lock properly
South wall of extension wrapped in hessian to prevent the lime render drying too quickly in the sun
Cutting out render and straw prior to fitting external window sill of reclaimed slate
Finished slate sills
Clay-straw plaster onto reed mat, closing the gap between sunroom and bungalow
Clay-straw plaster from the back
The mix - mostly long straw. Later coats of plaster will use chopped straw.
Bale-wrap strimmed within sunroom.
Newly-widened doorway into extension. Thankfully the existing lintels here were oversized, allowing me to widen the opening and still have the required overlap of lintel onto brickwork.
Stuffing straw into gaps between bales inside the extension. Mostly this was done as the walls were raised, but a few gaps slipped through the net. This was a big one.
Timber trim between window and render, treated with Osmo natural woodstain
I'm behind with updating this blog again. Enough changes have happened and photos amassed for at least two blog posts. First up: the initial coat of lime render went on a few weeks ago. This took three days, was sprayed on to drive the lime as deep as possible into the straw (for a good strong bond) and was overwhelming to watch, as the stack of bales suddenly became a building.
Here's a very short (and only slightly geeky) video of the lime being mixed and sprayed (in a fantastic roller-pan mixer which mixes it up and mushes out any lumps at the same time - one of these would be great for mixing clay plaster or even just clays in general for pottery use, but they're rare and expensive so I am unlikely to ever get one just for occasional use):
The render-gun is a pretty impressive bit of kit too, in combination with a large air-compressor. Three nozzles inject air through the base of a hopper full of lime, basically blasting any plaster out of its path forcing it out of the gun and onto everything within a four metre radius, but primarily onto the wall in front and the person holding the gun. A second person is needed - standing a little further back - whose goggles take a bit longer to get plastered, thus enabling them to direct the one with the gun (who rapidly loses sight as goggles become misted and spattered).
The render is a mix of lime-putty (pre-mixed, pre-aged, pure lime goop, roughly the consistency of soft cheese) and sand, plus some hair to add strength. Also added is a pozzolan - a natural additive that helps it set a bit faster. Unlike cement, lime doesn't have much of a chemical set to make it go hard rapidly; instead it cures slowly over time, as the lime putty (calcium hydroxide) reabsorbs carbon dioxide that was released during it's manufacture and returns chemically to calcium carbonate.
Lime putty is made by heating limestone/chalk to break the molecules and release the carbon from the calcium carbonate. This produces quicklime (calcium oxide) which is then slaked (soaked in water - a violent, dramatic, heat-producing reaction) to form the calcium hydroxide lime putty. More info on the lime-cycle can be found here, with handy diagram.
Lime boiling in a bucket after quicklime was mixed with water (slaked) - demo by the lovely Bee Rowan during the first strawbale I went on:
It is debatable whether lime has a lower embodied energy (the energy used to produce, process and transport the material) than cement, but it seems to be generally agreed that it does have a lower embodied carbon figure. The Greenspec website linked to above claims 20% less carbon emissions for production of lime compared to cement, due to the lower temperature lime is fired at. The Inventory of Carbon and Energy prepared by the University of Bath presents a more complex view:
Lime is often chosen as an environmentally friendly material. It was therefore surprising to learn that the embodied energy of lime was slightly higher than for cement. This was observed from the respectable sample size of 39 data records. Lime is fired in the kiln to a lower temperature than cement, which is often misconceived as proof for a lower embodied energy. The present authors suggest that yield, density, and time in the kiln are all vital parameters to total energy consumption and that firing temperature may not be used as a proxy for embodied energy. This is presented as a possibility for its higher embodied energy. It should be noted that embodied energy is, in itself, not evidence to discredit limes environmental credentials. Due to a more favourable fuel mix and slightly lower process related carbon dioxide emissions lime has a lower embodied carbon than cement. An additional benefit of using lime based mortar includes the increased ability for deconstruction, rather than demolition. The re-carbonation that occurs over the lifetimes of both cement and lime based mortars (when exposed to air) will reduce the embodied carbon impact of the materials. Its understood that this process is not undesirable for lime (unlike cement). Examination of lime's full carbon cycle, cradle-to-grave, is therefore necessary.
[Inventory of Carbon and Energy v.2, Prof. Geoff Hammond & Craig Jones, Sustainable Energy Research Team (SERT)
Department of Mechanical Engineering
University of Bath, UK, 2011]
Lime re-absorbs more carbon dioxide (CO2) than cement does as it cures, helping to make it a 'greener' material - all the CO2 released from the chalk or limestone is reabsorbed. So for lime the only real increase in atmospheric CO2 is any released by the fuel used to heat it.
Buildings built with lime are much more recyclable. At the end of a building's life lime mortar and render can be easily separated from other materials and recycled, also allowing for re-use of the other materials. Cement tends to stay too stuck to anything you put it on, making re-use of bricks, for example, very difficult.
Possibly the best reason for using lime render on strawbales is that it's "breathable" (vapour open), allowing any moisture that might find its way into the walls to escape. Moisture is drawn out through the lime and into the air outside. Bee Rowan (who ran most of the strawbale and clay plaster courses I did, and runs Strawbuild) always says lime render is like a Goretex jacket.
And finally, lime is much more flexible than cement, allowing the building to move and flex as it dries out, or the ground around it changes, without major cracking. Cement is very brittle and often stronger than the bricks it holds together, so if there is any movement it tends to cause large cracks, snapping the bricks.
The render work is being done by Lime Repair, who have a shiny new website here: www.limerepair.com
Now for some photos:
Adding last layer of scalpings (hardcore) to the extension floor. This brings it up to the correct level for the recycled foamed-glass gravel that will insulate and build-up the floor to the right place.
Common Toad, found during clean up for scalpings, relocated to the garden, near a good pile of stuff to hide under.
John who was very kindly helping me barrow the scalpings in was doubtful of my levelling technique (with a rake, by eye). We checked it and I felt quite smug. The area that he levelled later was much smoother though.
Momentous moment: the very first bit of render is sprayed on to the bales
Sam in a cloud of vaporised lime, demonstrating why a face mask is needed.
The render is blasted on then trowelled flat to compress it and push it further into the straw
Lovely lovely lime
The wonder-mixer. Apparently it's temperamental and awkward but I'm still very envious (especially as this one will run off domestic electric supply - many mixers like this need three-phase)
Lime putty/cream-cheese - the primary ingredient for the render
Surprise surprise, it belted down with rain throughout the morning of the first day of plastering, creating more mud everywhere to add to already very messy job
Lovely lovely lime again, mixed with sand and hair, ready to go on the walls
This coat is called the scratch-coat, for hopefully obvious reasons.
Pleasing detail by front door, one of Kuba's great design details (yet to be scratched)
Lime "fingers" where it's plastered up the reed matting, provides good grip for the render.
Gable wall gets it's first coat. Hessian scrim is used over any joins and every 'H' clip (the timber that clamps the bales onto the bungalow wall) to prevent cracking.
Checking something in the loft I discovered a bit of cavity-fill incident. Clearly they'd pumped a load up through the wall into the loft without realising. I'll spread it out at some point before installing the main insulation
In the loft
Dubbing out the walls (building out the depth where needed to create straight walls) using slate.
The un-trowelled spray finish - this part of the gable wall will be covered with cedar cladding.