This blog continues to be several weeks behind the onsite reality, but the onsite reality is several months behind the very unreal schedule so I suppose that's only fitting.
We've now built the big masonry stove (pictures below) that I'm so looking forward to cosying up to during any properly cold snaps. The main idea is to not need to heat the building very much, thanks to thick insulation and airtight construction. But sometimes in winter some extra heat will be needed.
The standard way of heating with wood in Britain is a metal stove or an open fire. Even the good ones get dangerously hot while lit, create a stifling atmosphere, are starved of oxygen to make them burn slowly (in order to provide constant heat, but also ensuring a very inefficient, smoky and polluting burn) and don't store much heat. Once the fire's out there is some residual heat but most of it is gone fairly swiftly.
Masonry stoves solve all of this. There are various versions from different countries (Germany and anywhere East and North of it, really) and they've been around for a long time. The designs have been tweaked over time, especially with improved means of testing the efficiency of combustion and the level of emissions produced. All are very clean-burning, producing the maximum amount of heat per amount of wood burned, with very low emissions (testing has shown them to have combustion efficiency of around 95% - on a par with modern and complicated log gasification boilers). The wood in a masonry stove is burned relatively quickly over 1 to 2 hours), with enough oxygen to ensure a clean burn. A secondary combustion chamber burns off the gases that burning wood releases, generating more heat and reducing harmful smoke emissions (it also doubles after firing as a bake or pizza oven, and looks amazing through the glass door during firing). There should be no visible smoke from a masonry stove. The flue-gases are taken for a wander around the stove, to make sure as much heat as possible is extracted from them before they exit via the chimney. The bricks store that heat, slowly and evenly releasing it over the next 12-24 hours, depending on the type and size of stove, and how well insulated your home is.
These lovely brick stoves never get too hot to touch so are great for cosying up to, much more pleasant to be around than the searing heat of a metal wood-burner. Ours will also heat water, toppping up temperature in the tank during the times when the hot-water solar-panels won't be so productive.
There's much more info at
www.stovemason.com, or on the specific type of stove we now have, at
www.stovemason.com/double-bell-heater/. The stove was built by a team of four headed by Martin Ruzicka, reduced to two later in the week, at which point I joined in with the brick-laying. I also cleaned up and cut the reclaimed York sandstone (previously part of some London pavements) which forms the shelves and oven top. I discovered that ancient chewing gum somehow still releases a minty smell when you sand it - I don't know what that stuff is made of but it's indestructible.
The bricks the stove is faced with are a slight indulgence in some ways - they are new, so represent a fairly high embodied energy from the fuel used to fire them - but they are local. The bricks are from Swanage brickworks, which is about 40 miles away. They're lovely and the same price as - or cheaper than - similar bricks from factories many many miles away; so of course none of the local suppliers stock them, stocking instead the ones from many many miles away. This is just one example of a messed up retail supply chain, so I'll try and avoid that particular rant here.
The stove builders and me were besotted with the bricks, despite their slight awkwardness to use (being handmade there are a fair few banana bricks). It was lovely hanging out with a bunch of friendly people who shared my enthusiasm for nice bricks and fire, and my obsession with finding more efficient ways of burning wood. We had geeky conversations comparing technical specifications of different bricks. It was great!
At some point I want to write about how wood fuel isn't necessarily so great after-all (a lot depends on where the wood comes from, and what you do with it, for example), but for now lets pretend it's a straightforward renewable fuel..
Anyway, here's the bit with the pictures.
 |
| Building regs compliant airvent cover, providing the stove with its own dedicated, permanently-open air-supply. Ideally this would be closable, so that cold air doesn't enter the stove once it's fired and closed down. Ah well. |
 |
| Checking brick layout. Some clear and accurate measuring at this point would have ensured the near end of the stove was in the right place. Apparently what I actually did was some confused and inaccurate measuring - the stove is now a little closer the outside wall (behind camera viewpoint), causing the planned doorway there to be a bit restricted. Again: ah well. |
 |
| Hot-water heat-absorber positioning. Stove base built around air-supply, so air is channelled under the ash-pit floor and up around the sides of the firebox. |
 |
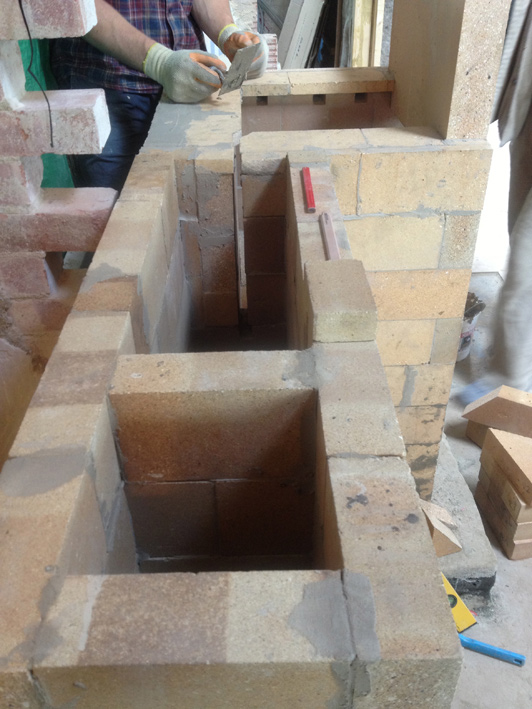
| First chamber/bell in the flue section (they call them "bells", I call them chambers because I'm used to kilns), with vertical flue nearest the camera. The exit from the first bell into that flue is at the bottom (diagram at the bottom of this page, will probably make more sense...) |
 |
| Completed firebox, with primary airholes in sides and back (supplying air from outside the building) |
 |
| Oven/secondary combustion chamber roof, made from refractory castable mix. |
 |
| Oven roof being lifted into place. |
 |
| Ta-da! From bottom up: ashpit, firebox, secondary combustion chamber (a.k.a oven). The opening from firebox to oven is a restricted "throat" - this pressurises the gases released from the burning wood. As the gases enter the oven they expand and mix with oxygen causing a very effective second stage of burning, resulting in a very effiecient overall burn and very low emissions from the stove. |
 |
| The stove masons with the finished refractory core. |
 |
| Braze-welding the heat-absorber plumbing (braze welding is sort of a higher-temperature form of soldering - it won't melt inside the stove like standard solder would, and can also take higher pressures). |
 |
| All the hot-water heat-absorbers joined together. |
 |
| The completed heat-absorber circuit is then pressure tested to 8 Bar to ensure there are no leaks, first with air, then with water. |
 |
| The outer skin begins, using lovely Swanage bricks (local handmade Dorset bricks - same price as other available bricks, nicer, yet local suppliers prefer to stock bricks from many many miles away). |
 |
| Martin shrugs, pointing trowel in hand. He actually enjoys pointing-up brickwork. This is a rare and wonderful thing. The outer skin is built using clay mortar - clay from the mountain in the garden mixed 3:1 with sharp sand. |
 |
| Woodlouse! |
 |
| Cody cuts a brick for the oven door arch. Fowlers tool hire have done quite well out of this build. They are very helpful though. |
 |
| A genuine head-scratching moment. Both arches (flat and curved) in place. |
 |
| Almost finished, apart from the height issue. The core was too close to the timber stud wall and ceiling above, so we had to reduce it in height. |
 |
| Thermometer, showing temperature in first bell. There's another at the base of chimney. When in use the temperature in the secondary combustion chamber/oven could reach up to 600 degrees Celsius, but the temperature in the chimney shouldn't be more than around 120 degrees, as so much heat will be absorbed by the bricks (and the hot-water system). |
 |
| At this point we ran out of time and the last-man-standing (Cody) had to go home. |
 |
| I finished the brickwork fitted the insulation to the top of the stove (three layers of calcium silicate insulation board and a thick layer of clay-mortar). Eventually this will be capped with York sandstone (reclaimed street paving stones, like the top of the main stove) and the twin-wall insulated stainless-steel chimney will be fitted above the flue (nearest the camera). |
 |
| Finished-ish. | |
 |
| Black arrows show air/flue-gas flow through the stove. The circuitous route ensures as much heat as possible is collected and stored by the bricks. |
 |
| Cross-section, showing stove and bells/chambers. Image by Martin Ruzicka, www.stovemason.com |


No comments:
Post a Comment